Choose the Right Heat Shrink Tubing Sizes for Cable Labeling
In accordance with industry guidelines from the National Electrical Manufacturers Association, correct identification of cables improves security, efficiency of maintenance and reliability of systems in electrical environments.When cable labeling, you have to pick the right heat shrink tubing size. If the tubing is too small then it won’t fit over the cable or connector. If it is too big, then it may not be able to shrink tightly enough to stay on the cable. Let’s know the selection of the optimal heat shrink tubing size and methods to maximize professional cable labeling effectiveness.
Understanding Heat Shrink Tubing Size
In determining the best size of heat shrink tubing two important specifications should be taken into consideration the diameter of the pre-shrink and the ratio of shrink.
Pre-Shrink Diameter
The dimensions of tubing that is heat-shrink refers to the size before the heating. This measurement determines if it can be placed over a wire bundle or connector prior to shrinking.
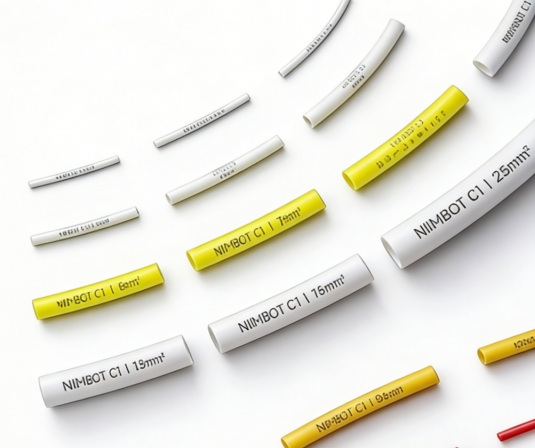
The most common sizes of tubing are:
| Tubing Diameter | Typical Application |
| 1.6 mm (1/16″) | Small signal wires |
| 3.2 mm (1/8″) | Thin electronic wiring |
| 6.4 mm (1/4″) | Standard electrical cables |
| 9.5 mm (3/8″) | Medium cable bundles |
| 12.7 mm (1/2″) or larger | Industrial wiring systems |
Choosing a diameter that is slightly larger than the cable ensures easy installation before shrinking.
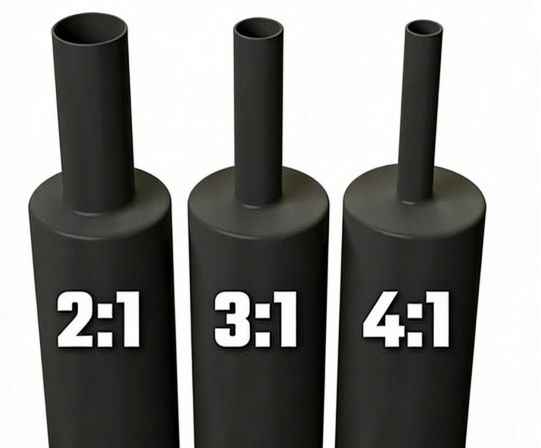
Shrink Ratio
The shrink ratio describes how much the tubing will contract after heating. For example:
| Shrink Ratio | Meaning |
| 2:1 | Shrinks to half its original diameter |
| 3:1 | Shrinks to one-third of the original diameter |
| 4:1 | Shrinks to one-quarter of the original diameter |
Higher shrink ratios provide more flexibility when cables include connectors or irregular shapes. According to technical documentation from the UL Solutions, selecting the correct shrink ratio ensures that tubing forms a secure and reliable fit after installation.
Measure Cables for the Correct Heat Shrink Tubing Size
Measurement Accuracy = Selection Excellence!
Step 1: Measure the Cable Diameter
The user must implement a digital caliper or ruler or wire gauge tool for measuring the external diameter of the cable or wire bundle. The user needs to measure the thickest part of the cable because connectors may exist in the design.
Step 2: Choose a Slightly Larger Tube
As a general rule, the tubing pre-shrink diameter should be 20 – 30% Larger than the diameter of the cable for easy sliding of the tubing over the cable, prior to application of any heat.
Step 3: Determine the Shrink Ratio
The tubing must have a shrink ratio that will enable the tubing to shrink to a size that will allow it to grab or be a snug fit on the cable after the application of heat. Tubing that does not have enough shrink will be too loose to stay in a fixed position.
When the label is sized properly, it will stay secured for the life of the cable.
Recommended Heat Shrink Tubing Sizes for Cable Types
Different cable gauges require different tubing sizes. The table below shows general recommendations for common cable types.
| Wire Gauge | Recommended Tubing Size | Typical Application |
| 24–22 AWG | 1.6–2.4 mm | signal wiring |
| 20–18 AWG | 3.2 mm | electronics equipment |
| 16–14 AWG | 4.8 mm | building wiring |
| 12–10 AWG | 6.4–9.5 mm | power distribution |
| 8 AWG and above | 12.7 mm+ | industrial cables |
The ranges can vary based on the insulation thickness, however they can be a useful base to choose the appropriate cable labeling tubing.
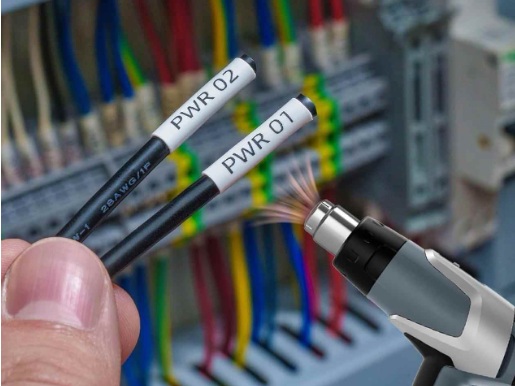
Best Ways for Printing Heat Shrink Cable Labels
To ensure that you have long-lasting and clear cable labels, it’s crucial to follow a few best ways.
The first step is to select the specific heat shrink tubing made to print. The tubing that prints ensures that the text is legible after shrinking.
Second, make use of high-quality printing technology. Industrial labeling systems like MakeID W110 Industrial Label Printer support tough label materials specifically made for cable identification. Thermal transfer printing creates sharp text that resists fading and scratching.
Then, make sure that the labels are legible when shrinking. The text should be placed in the center of the tubing and sized appropriately for the final shrunk diameter.

Choosing the Right Heat Shrink Tubing Size
The proper selection of heat shrink tubing sizes is essential for creating high-quality cable labeling. Your labels will maintain their visibility and attachment strength through the entire product life cycle when you use tubing that matches your needs.
For the best tubing:
- Take note of the cable’s diameter with precision.
- Choose tubing that has a greater pre-shrink diameter
- Confirm that the proper shrink ratio is in place.
- Utilize high-quality heat shrink tubing and labeling tools
Following these steps, installers and technicians can design solid cables identification systems that enhance the efficiency of maintenance and minimize the number of wire errors.
As the modern communication and electrical systems get more complicated resilient labels like heat shrink tubing will continue to play an important function in maintaining cable networks in order as well as safe and easy to manage.