How to Label Wires in Control Panel

Lead Specialist, Telecom Digitalization & Identification at MakeID
As Lead Specialist at MakeID, he drives digital transformation for physical asset identification in FTTx. Optimizing field maintenance and data accuracy, he helps global telecoms reduce MTTR and enable real-time asset-data alignment.
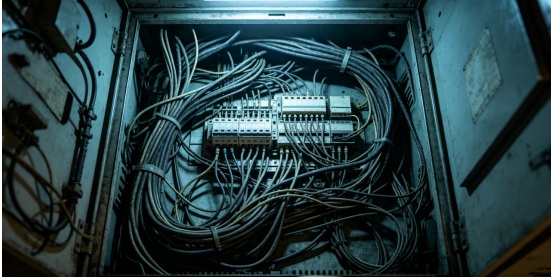
Imagine opening a control panel to diagnose issues, but then you discover the “spaghetti mess” of unidentified wires. If the wiring is not properly labeled, a simple replacement of ten minutes could turn into hours of risky crossing-references and continuity tests. In the field of electrical engineering, labels are more than labels. It can be a guide for security and effectiveness. Therefore, let’s examine the best practices, standards for professionals, technological techniques, and the essential tools needed to master the art of wire labeling in any control panel setting.
Control Panel Wire Numbering Standard
Before labeling any wire, it’s essential to follow recognized standards. The control panel design needs a numbering system that must be clear and consistent to achieve professional status.
Common Standards
There are two electrical system standards which people commonly use as references.
International Electrotechnical Commission (IEC)
- Provides global guidelines for electrical labeling, including wire identification and numbering systems.
National Fire Protection Association (NFPA)
- Defines safety requirements, especially for electrical installations in North America.
The standards enable all personnel including engineers and electricians and maintenance staff to quickly comprehend the wiring system.
Naming Conventions
A successful labeling system is based on three basic principles:
- Consistency-Use the same format throughout every panel (e.g. L1, T2 PLC-01)
- Readability-Labels should be easy for you to be read in a glance even in dark or tight areas.
- Logical Structure-Labels should reflect the function or location of the wire
Color Coding Principles
Color coding adds another layer of clarity. For example:
- Red → Power lines
- Blue → Control circuits
- Green/Yellow → Ground
Although color code alone isn’t enough to be effective, its combination with clear labeling greatly enhances the effectiveness.
Key takeaway: Wire labeling is not just about sticking labels—it’s about building a system
Tools You Need for Professional Wire Labeling
Using proper professional tools greatly boosts labeling efficiency, clarity and overall quality of wire labels.
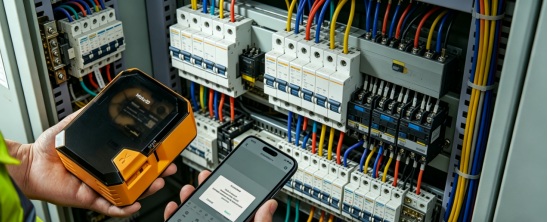
Label Printers
Dedicated industrial printers guarantee unified format, high-resolution printing and durable clear markings. MakeID provide specialized printers ideal for various control panel wire labeling tasks.
Labeling Software
Professional software supports template design, unified numbering rules and convenient batch printing for large wiring projects.
Industrial Label Materials
Select heat-resistant, waterproof and oil-proof materials according to different working environments to maintain long-term label legibility.
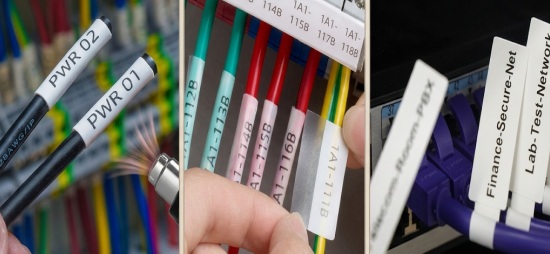
Types of Wire Labels for Control Panels
Knowing the different wire label styles makes it easier to select the right one for your unique setup.
| Label Type | Features | Advantages | Best For |
| Flag Labels | Wrap around the wire and extend outward, creating a “flag” shape. | -Large printable surface-Easy to read from multiple angles | -Communication cables-Fiber optics-Thin wires |
| Heat Shrink Tube Labels | Labels shrink tightly around the wire when heated, creating a permanent marking. | -Extremely robust-Resistant to chemicals, heat and scratching | -Industrial control panels-High-vibration environments-Critical systems |
| Self-Laminating Labels | Include a clear protective layer that wraps over the printed text. | -Waterproof and smudge-proof-Long-lasting readability | -Outdoor applications-High-humidity environments-Harsh industrial settings |
Step-by-Step: How to Label Wires in Control Panel
Step 1: Plan Your Labeling System
Begin by establishing a common numbering system that is aligned with the official wiring standards for control panels. Use consistent circuit identifiers, including phases codes (L1/L2/L3) and terminal numbers and PLC port marker numbers to correspond with existing electrical wiring diagrams. Make sure you have a sequential naming system for each wire in the panel and identify each dual-end with a unique dual-end ID for each cable in order to prevent cross-circuit confusion in later repairs. The process of pre-planning helps avoid inconsistent marking and guarantees complete traceability of wiring.
Step 2: Choose the Right Wire Labels
Select label materials tailored to internal panel operating environments. Basic self-adhesive labels suit low-heat static indoor panels with simple identification needs. Heat shrink tube labels deliver permanent tight wrapping and high temperature resistance for heavy-duty industrial setups. Self-laminating labels feature transparent protective film layers that shield printed content from dust, oil, and moisture damage in humid operating conditions. Material adaptability directly determines label service life under continuous panel vibration.
Step 3: Print Labels Clearly
Professional industrial labeling requires machine-printed clear characters over unreliable handwritten markings. Handwritten text blurs quickly under heat exposure and fails industrial compliance audits. Use dedicated industrial label printers for high-resolution sharp printing of numbers, codes, and symbols. Text that is clear and smudge-proof ensures the long-term viability of text and is compliant with the requirements of certification for panels to ensure clear visual identification.
Step 4: Apply Labels Correctly
Label all wires within 50mm of the terminal block connections, maintaining an even orientation for simple visual scanning, without blocking wire terminals. Apply markers to both ends of each wire in accordance with normal guidelines. Keep a proper distance to prevent label overlap, and to keep clear of the points for cable connections and ensuring that wiring operations are safe without interference from labels.
Step 5: Verify and Document
Complete a full cross-check against diagrams of electrical schematics to ensure no missing, misplaced or mismatched wire labels, misplaced, or not matched. Create digital labeling documentation for future maintenance of the panel as well as component replacement and inspections for safety. A verified standardization of markings ensures tracking throughout the entire panel lifecycle.
Wire labeling is usually the final step of a project, yet it’s the one which determines what you can expect from your project for years to come. When you adhere to the highest standards of professional practice, selecting sturdy materials, and using high-quality tools from MakeID , it is possible to transform a complicated system into a well-organized durable, safe, and long-lasting asset.