How to Design & Print Cable Labels? 5 Tips for Organized Wiring
Tangled cables plague offices, server rooms, workshops, and home junction boxes. They mar tidiness and spark maintenance troubles—hard-to-locate wires during troubleshooting, messy interfaces for new devices, and untraceable broken lines—slashing efficiency and causing unnecessary losses.
The fix for messy cabling is “visual management,” with scientifically designed, clearly printed cable labels as the key. A tiny label makes each cable’s “identity” instantly recognizable, turning chaos into order. Below are 5 practical, scenario-tailored tips to simplify cable label design and printing.

Tip 1: Clarify Label Information Hierarchy, Prioritize Key Content
The core value of cable labels is “quick identification,” and a clear information hierarchy is fundamental to achieving this. Overloading labels with unorganized information not only fails to guide but also increases recognition difficulty.
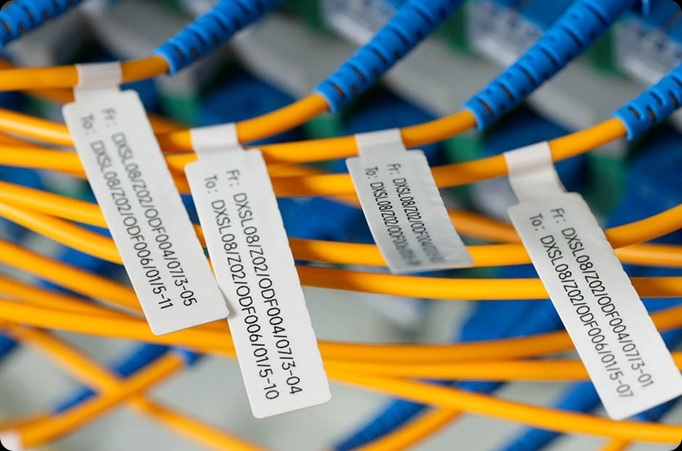
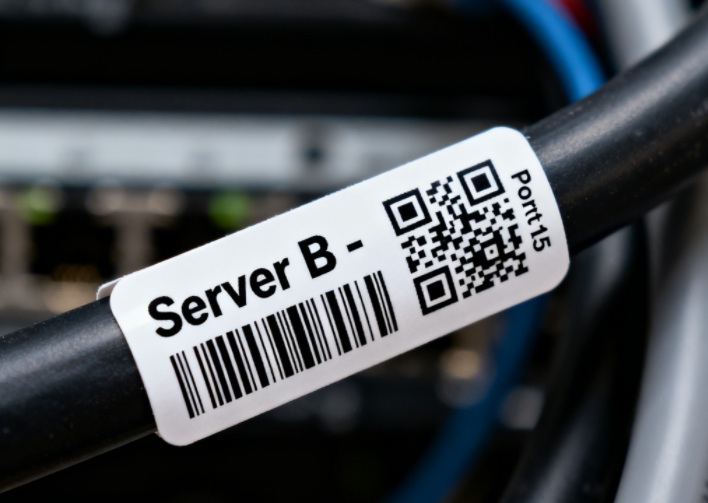
First, identify core information based on usage scenarios. Key details vary: in server rooms, focus on device name, port number, IP address, and area (e.g., “Server A – Port 23 – Room 3”); in offices, simplify to “Finance Dept – Printer – No.1”; for home junction boxes, straightforward function descriptions like “Broadband Inlet” or “Router LAN 1” suffice.
Second, prioritize information by importance. Adopt a “core + supplementary” structure—place core details prominently and keep supplements concise. For example, server room labels follow “Device Name → Port → Maintenance Date,” while home labels use “Function → Location.”
Finally, ensure concise and standardized information. Avoid lengthy descriptions; use standard abbreviations with team-wide consensus. Limit each label to 3-4 items—excess information forces smaller fonts, hindering readability.
Tip 2: Choose Suitable Label Materials & Sizes for Wiring Environments
Cable labels are not only practical, but can be suited to specific needs. There is an assortment of labels specific to material, design, oil, wear, humidity. acrid corrosion, and temperature. Each situation and environment determines the label requirements.
Cable Labels: the best materials and locations to use
Cables in workshops and factories are the best locations for waterproof, oil-proof, and heat-proof durable, long-lasting labels. Server rooms should use flame-retardant materials to decrease server hazard. Flexible and heat-resistant PET labels are reflective of little to no wear, and homes only need paper.
Cable Labels: The correct sizes for the environment
For plugs, use 10 to 15 mm sized labels, and 20 to 30 mm long, whereas 30 mm wide to 20 mm in length will suffice for larger cables.
UV-resistant stickers will also be a useful addition for outdoor labels to keep the labels clean and clearly readable.
Tip 3: Optimize Label Design Layout, Improve Recognition Efficiency
How easy or difficult it is for you to identify and spot labels is largely a matter of how they are designed and arranged. Well-structured labels designfully increase an organization’s ability to discern specific labels on cables. Well-structured Orientations (Vertical/Horizontal) and colors (Light on Dark) improve functionality and efficacy.
Vertical arrangements are ideal for server rack cables that are routed/organized vertically. Foldable labels are space-savers that deliver on providing all the necessary details (Key content on the front side; Continuous content on the Back) alongside wrap-around labels that are visible on all sides.
Light-on-light combinations and fancy colors are to be avoided. Increased efficiency is garnered from the consistent use of certain colors to improve the efficiency of distinguishing between cables of different types.
To enhance readability, use a highly contrast text and background combination. People are able to read a text of at least an 8pt size from a distance of 1-2 meters and it should be curb free; no italics should be used and the text is better off being block letters.
For cables managed in sets or batches, they can be tagged with printed labels of QR codes or barcodes for rapid scans. They can be used to command information about specifications, installation date and maintenance history.
Tip 4: Select a Matching Label Printer, Ensure Printing Quality
A suitable label printer is key to ensuring label quality—different usage scenarios and label materials require matching printer types. Mismatches can cause blurred text, ink peeling, or paper jams, compromising label performance.
First, determine the printer type. Two common options: thermal transfer and direct thermal printers. Thermal transfer printers use ribbons to transfer text/images to labels, delivering clear, wear-resistant, and waterproof results. Ideal for PET/Vinyl labels and high-durability scenarios like server rooms, workshops, or outdoors—they’re the top choice for cable labels. Direct thermal printers need no ribbons, using heat to print on special paper. They’re fast and cost-effective but prone to fading in harsh environments, suiting short-term indoor paper labels (e.g., temporary home junction box or office connection labels).
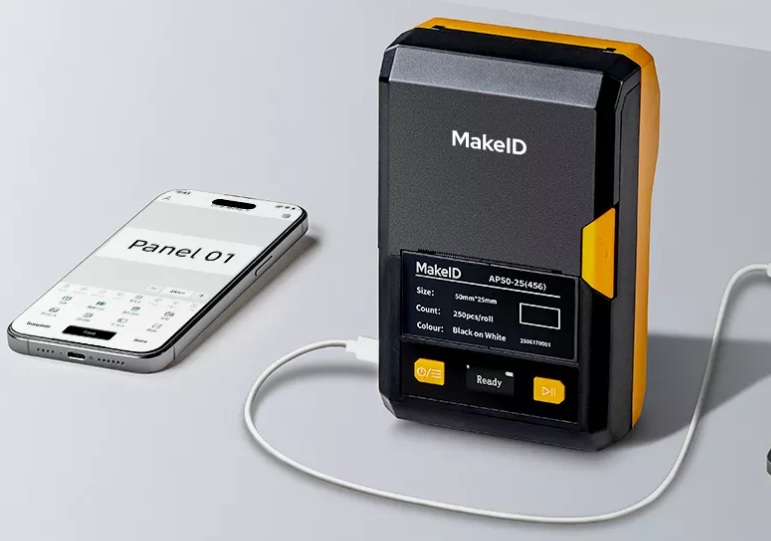
Second, focus on core parameters. Resolution (≥300dpi recommended) ensures clarity, critical for barcodes, QR codes, or small text. For batch printing, choose printers with continuous feed and label rolls to avoid frequent paper changes. High-end models supporting custom sizes and bulk data import work well for large-scale projects like server room wiring or factory equipment installation.
Tip 5: Standardize Pasting Operations, Extend Label Service Life
Even perfectly designed labels will peel off or blur if applied improperly, undermining their effectiveness. Attention to detail is crucial—establish a complete standardized process from application to post-maintenance.
For proper application: First, clean the cable surface with a dry cloth to remove dust, oil, and moisture. A dry, clean surface ensures strong adhesion; otherwise, labels may easily fall off. Apply labels smoothly to avoid wrinkles or bubbles. For wrap-around labels, wind them clockwise around the cable once for a tight fit. Position matters too: attach labels 15-20cm from interfaces for server rack cables (easy to check during plugging/unplugging); place them in the middle of mobile device cables (to prevent peeling from bending); and affix one every 1-2 meters on main bridge cables (for long-distance identification and troubleshooting).
Post-maintenance is equally important. Regularly inspect labels and replace peeling or faded ones promptly. Update label information when cables are moved or replaced to avoid misleading mismatches. For batch-managed labels, create an inventory log recording cable details, installation dates, and maintenance records for easy traceability and management.
Bottom Line
While designing and printing cable labels may seem trivial, they significantly enhance the standardization and efficiency of wiring management. By following the five tips—”clarifying information hierarchy, matching materials to the environment, optimizing layout design, selecting suitable printing equipment, and standardizing operational processes”—you can transform messy cables into a “traceable and easy-to-understand” system. Whether it’s daily maintenance, troubleshooting, or equipment upgrades, a great deal of time and effort will be saved.